
Wear and tear is inevitable. If you’ve been driving your UTV for a while, you’ll know that a scratch is going to befall your machine one way or another. You’re likely here because you’re trying to see if you can reverse such damage. But while something like a scratch on your UTV’s hull can be buffed out at an auto repair shop or even in your own garage with your own tools, doing so for your UTV windshield can be a little trickier.
Not to worry! Because we have a fix for this. You’ll only need some cleaning supplies and a bit of time to make your windshield as smooth as the day you first got it!
However, before that we’ll need to define the exact problem you have. First, identify your windshield’s material. If you bought it as a modular piece that you installed or it came with your vehicle, look up the instruction manual or ring up the company you got your UTV from so you can find out what your windshield is comprised of.
Windshields typically come in 3 different materials: glass, polycarbonate and acrylic. Glass windshields are typically the hardest to scratch, but if that’s’ what you have you may have gotten a little unlucky. Buffing them out is a fairly simple affair that can be done with a fair number of household supplies that you should already have on hand.
Polycarbonate is a little more complex, requiring special solvents and cloths to be purchased to do the job right. Pay attention to what we have to say down below because some materials can even damage your screen even more. Lastly, acrylic windshields are known to be the most resilient ones as well as being easy to buff out. The process is simple and quick. Now let’s get buffing!
Removing scratches from glass UTV windshields
Buffing out scratches in glass can be done in 2 ways: 1) regular buffing and rubbing with a specific mixture and 2) filling the scratches in with something else. Do make sure that the glass needs to be fully clean of any oil or dirt before the buffing process. Do note that these methods work best with small scratches: anything that catches your fingernail might be too deep and will require more specialised help.
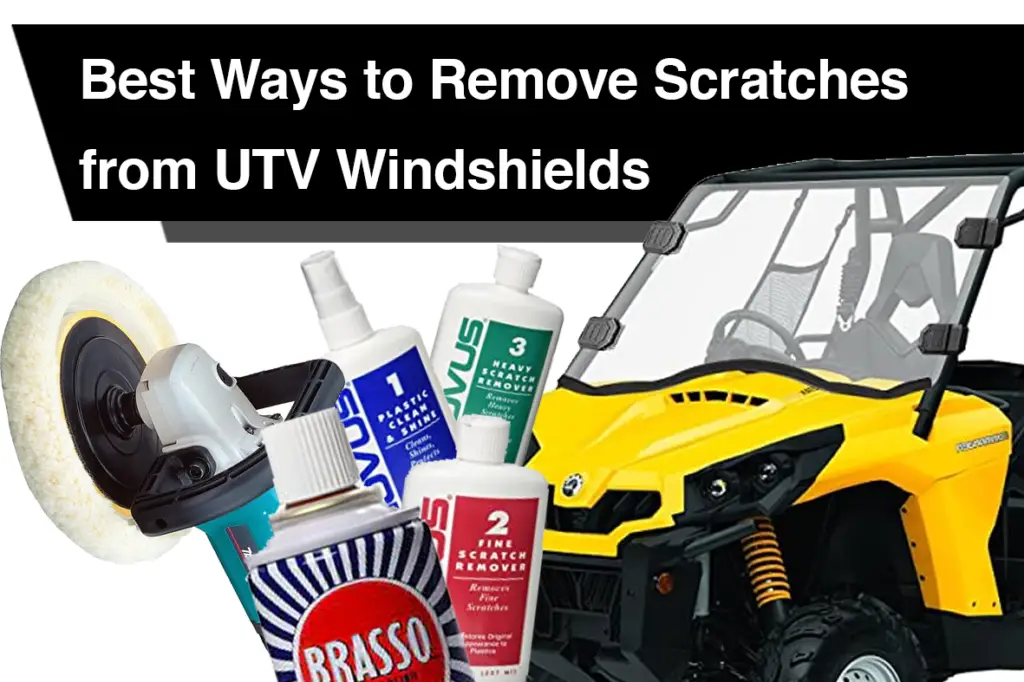
1. Buffing with Home-made Solutions (Glass)
The first can be done with baking soda. Just mix it in equal parts with water and dab a cotton bud into the bowl before rubbing it around the area in circular motions. Then, wipe first with a clean cloth dabbed in warm water then wipe dry with a smooth cloth and repeat as necessary if the scratch is still present. This can be done with a toothpaste (paste, not gel!) and soft cloth as well instead of a baking soda solution and cotton balls. Any hand soap with pumice is also a great solution, and people like the man in the following video have shown that basic solutions (and a buffing tool if you have one handy) with pumice can work wonders:
2. Filling Scratches with Clear Nail Polish (Glass)
The second can be done with either a metal cleaner/ polish such as Brasso Metal Polish or clear nail polish. The process of applying Brasso is entirely the same as the buffing process. Simply apply a small amount (be wary as too much can damage the glass instead) to a cotton swab and polish for several seconds, then clean and wipe as per the prior method. You might find that the area you’ve polished will look foggy after, so you’ll ned nail polish remover on hand to fix that up.
With the clear nail polish remover, you’ll have to thinly spread it over the scratch and let it dry. Once done, dab a cloth in nail polish remover and wipe over the areas surrounding the scratch to make sure that you clean up whatever nail polish shouldn’t be there. If you don’t have any clear nail polish in your home, we recommend getting one like Ellie Chase top coat and bottom coat, especially since clear nail polish is useful for covering up a whole host of different scratches too.
Removing scratches from acrylic and polycarbonate UTV windshields
The process for buffing and polishing acrylic and polycarbonate screens is fairly simple. All you’ll really need is Novus Plastic Clean & Shine, a solution meant for polishing out minor scratches on both materials. Get the number kit in the link that sells all 3 solutions, as each of them are needed in a 3 step process.
3. Remove Scratches with Plastic Polishing Liquid (Polycarbonate/Acrylic)
Polish aggressively with Novus No. 3, then 2 to polish out the matte finish, then buff with No. 1. As always, use these chemicals in small amounts; they might damage your material if you aren’t careful. Using a buffing wheel adds to this process if you have a bench grinder, but isn’t entirely necessary! Plus, you run the risk of overworking the polycarbonate due to it being a fair bit softer than acrylic.
4. Buff out Scratches with Sand Paper or Polishing Tools (Polycarbonate/Acrylic)
The buffing process for these can also be done by vapour polishing or more intensive fine grain sandpaper polishing. However, both take more time and skill. Sandpaper polishing requires a much more fine hand and a softer touch with the polycarbonate windshield, but can be done with 320 grits if you find yourself strapped for resources; do be very careful, and focus more on doing it right in steady motions over dong it fast. We especially wouldn’t recommend the vapour polishing method due to the health risks posed if you don’t wear the right protective gear.
The following video shows the buffing process and solution for plastic screens like polycarbonates and acrylics too, particularly for motorcycles but still just as useful to note.
And that’s that on the removing UTV windshield scratches! We hope this article has been helpful in getting your windshield back to its pristine shape, and that you’ll be able to extend its use with these tips. Forking out the money to pay for an entirely new one that’s sand-beaten and banged up can be costly, but keep these tricks in mind and you’ll be able to avoid breaking the bank!
Have any secrets and tips of your own? Feel free to share them with us down below!