
When and How Often Should I Replace the Belt?
If your turntable is your pride and joy, giving it a little tender loving care is only natural. So far, we’ve gone through all you need to know about a belt drive turntable and its speed problems. Now, how often should you replace the belt in your little mood-lifting system?
When your belt stretches or wears, it causes a slip, resulting in a slower turntable speed. By changing the drive belt on your turntable with a new, high-quality belt, you may reclaim the listening pleasure you’ve once had when it was brand new. It’s definitely time to replace the belt when you’re playing a Chipmunks record and it sounds like Barry White!
Belts stretch and deteriorate over time as a result of pollutants in the environment, causing the rubber to become stiff and brittle as it loses elasticity. The belt you’re using will stretch and start to slip after a certain amount of time, depending on the frequency of usage. When a belt has to be replaced, it will begin to slip, which will be audible as the platter’s speed lowers. According to a forum, some users change to a new belt every two years at the regular service intervals. On average, belts should be replaced around 3-5 years.
Another indication that your belt is failing is a slow start-up or if the platter appears to be spinning too rapidly. A certain belt thickness and tension were considered when designing the belt system. When a belt is worn, the resistance decreases and the platter speed increases. Additionally, a belt that has stretched more than 5% over its new length should be replaced.
To keep it concise, consider replacing your turntable belt if:
- Your records have a lower or deeper tone to them.
- When the needle touches the record, you notice a difference in speed.
It is also good to note that if you don’t play your turntable on a regular basis, do run them once in a while to keep your turntable belt in tip-top condition. You can also download and use a “strobe disc” which double-checks the speed of your record player to ensure it’s in good working order.
How Do I Replace the Belt?
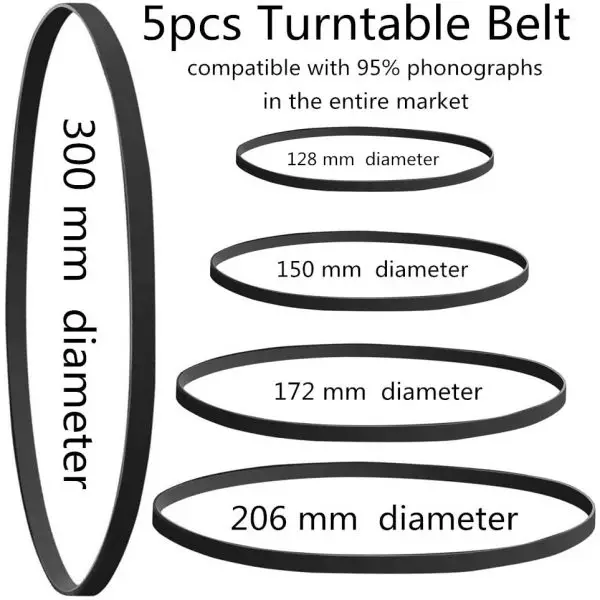
Even if you have the clumsiest hands, there is good news for all types of turntable owners. Changing your drive belt is a highly simple and cost-effective process. First, you’ll need to work out the correct size of your belt to order. Almost all turntables use belts that have lengths of 19.6″, 20.7″, 21.4″, 22.4, 23.6″, 25.0″, and 35.1″.
In general, you’d want to measure your old belt. When it comes to length, you have to subtract 5-10 mm in anticipation of being stretched. In the case your model doesn’t have an old belt, you can consider measuring the circumference of the platter’s hub.
Feeling a little confused? We have you covered. Check out the video below to estimate the size of rubber that’ll fit your turntable like a glove.
If you’re someone who prefers to read the instructions, check out this extensive guide in replacing your turntable belt.
One of the most cost-effective modifications you can make to your hi-fi system is replacing the belt. Do a quick search and you’ll find that these belts should not cost you more than $15 (minus shipping). They usually also come in multiple pieces so you’ll be covered for the next few years, or more.
Once you have the belt on hand, it’s time to change it. We’ll let the specialist advice you on this one, check out the short video below that we feel is the most comprehensive and useful.
It makes a big difference how tight or loose your turntable belt is. To guarantee that the vinyl sounds appropriate when played, you must have the proper amount of tension on the belt. Slippage can be caused by a slack belt and pulley parts might be overloaded by a belt that is overly tight.
Some Tips for Better Experience
Before your turntable will get into the full swing of things, allow at least 1 hour for the new belt to break in before engaging in intense listening. Oddly enough, the belt will sound better on one side than the other, so experiment by drawing a line with a felt pen or a dot of paint on the side you choose.
When a little talc powder is brushed over the surface of a belt, it often helps to remove mechanical noise. The belt should have the lowest tension without wow or flutter to eliminate mechanical noise and sound best. Try and experiment with tension to hear what sounds best.
Make sure the player is turned off and unplugged before attempting to clean the rubber turntable belt. After that, you must remove the rubber pad from the platter and then take the platter off of the spindle to get to the belt to clean it. The belt can then be removed with ease and care.
Rubber conditioners, polishes, and other similar products should not be used on the belt. The running surface of your pulley, sub-platter, or platter should be cleaned with methylated Spirit on a regular basis, especially if black rubber deposits begin to form. Otherwise, simply wipe with plain water or methylated Spirit if required. This will keep your belt longer-lasting and at peak cleanliness.
Parting Words
And voila! Replacing your turntable drive belt is as simple as that.
To retrace all the steps, you’d first want to make sure your belt is no longer at peak performance before going online to find the right one. Remember, getting a pack of belt rubbers should not be daylight robbery and you’ll be able to find them off AliExpress or Amazon.
Next, simply replace the belt using the written steps or video included above. Read up on the provided tips if you have the time and enjoy your good-as-new turntable.
Most importantly, have fun with it and we wish you all the best and all that jazz.